[ 1 ~ 2 ] 다음은 단위를 변환하ㅓ는 추상클래스 Converter이다.
1. Converter 클래스를 상속받아 달러를 원화로 환산하는 WonToDollar 클래스를 작성하라. main()함수와 실행 결과는 다음과 같다.
[결과]

[소스 코드]
#include <iostream>
using namespace std;

class Converter
{
protected:
	double ratio;
	virtual double convert(double src) = 0; // 순수 가상함수
	virtual string getSourceString() = 0;
	virtual string getDestString() = 0;
public:
	Converter(double ratio) { this->ratio = ratio; }
	void run()
	{
		double src;
		cout << getSourceString() << "을 " << getDestString() << "로 바꿉니다.";
		cout << getSourceString() << "을 입력하세요 >> ";
		cin >> src;
		cout << "변환 결과 : " << convert(src) << getDestString() << endl;
	}
};

class WonToDollar : public Converter
{
protected:
	double oneDollarWon{};
public:
	WonToDollar(double oneDollarWon) : Converter(ratio) { this->oneDollarWon = oneDollarWon; }
	string getSourceString() { return "원"; }
	string getDestString() { return "달러"; }
	double convert(double src) { return src / oneDollarWon; }
};

int main()
{
	WonToDollar wd(1010);
	wd.run();
}
2. Converter 클래스를 상속받아 km를 mile(마일)로 변환하는 kmToMile 클래스를 작성하라. main()함수는 다음과 같다.
[결과]

[소스 코드]
#include <iostream>
using namespace std;

class Converter
{
protected:
	double ratio;
	virtual double convert(double src) = 0; // 순수 가상함수
	virtual string getSourceString() = 0;
	virtual string getDestString() = 0;
public:
	Converter(double ratio) { this->ratio = ratio; }
	void run()
	{
		double src;
		cout << getSourceString() << "을 " << getDestString() << "로 바꿉니다.";
		cout << getSourceString() << "을 입력하세요 >> ";
		cin >> src;
		cout << "변환 결과 : " << convert(src) << getDestString() << endl;
	}
};

class KmToMile : public Converter
{
protected:
	double Km{};
public:
	KmToMile(double Km) : Converter(ratio) { this->Km = Km; }
	string getSourceString() { return "Km"; }
	string getDestString() { return "Mile"; }
	double convert(double src) { return src / Km; }
};

int main()
{
	KmToMile toMile(1.609344);
	toMile.run();
}
[ 3 ~ 4] 다음 추상 클래스 LoopAdder가 있다.
3. LoopAdder 클래스를 상속받아 다음 main() 함수와 실행 결과처럼 되도록 ForLoopAdder 클래스를 작성하라. ForLoopAdder 클래스의 calculate() 함수는 for 문을 이용하여 합을 구한다.
[결과]

[소스 코드]
#include <iostream>
using namespace std;

class LoopAdder
{
	string name;
	int x, y, sum;
	void read();
	void write();
protected:
	LoopAdder(string name = "") { this->name = name; }
	int getX() { return x; }
	int getY() { return y; }
	virtual int calculate() = 0;
public:
	void run();
};

void LoopAdder::read()
{
	cout << name << ":" << endl;
	cout << "처음 수에서 두번째 수까지 더합니다. 두 수를 입력하세요. >> ";
	cin >> x >> y;
}

void LoopAdder::write()
{
	cout << x << "에서 " << y << "까지의 합 = " << sum << "입니다. " << endl;
}

void LoopAdder::run()
{
	read();
	sum = calculate();
	write();
}

class ForLoopAdder : public LoopAdder
{
protected:
	string name;
public:
	ForLoopAdder(string name) : LoopAdder(name) { this->name = name; }
	int calculate();
};

int ForLoopAdder::calculate()
{
	int x = getX();
	int y = getY();
	int sum{};

	for (int i = x; i < y + 1; i++)
		sum += i;

	return sum;
}

int main()
{
	ForLoopAdder forLoop("For Loop");
	forLoop.run();
}
4. LoopAdder 클래스를 상속받아 다음 main() 함수와 실행 결과처럼 되도록 WhileAdder, DoWhileLoop-Adder 클래스를 작성하라. while 문, do-while 문을 이용하여 합을 구하도록 calculate() 함수를 각각 작성하면 된다.
[결과]

[소스 코드]
#include <iostream>
using namespace std;

class LoopAdder
{
	string name;
	int x, y, sum;
	void read();
	void write();
protected:
	LoopAdder(string name = "") { this->name = name; }
	int getX() { return x; }
	int getY() { return y; }
	virtual int calculate() = 0;
public:
	void run();
};

void LoopAdder::read()
{
	cout << name << ":" << endl;
	cout << "처음 수에서 두번째 수까지 더합니다. 두 수를 입력하세요. >> ";
	cin >> x >> y;
}

void LoopAdder::write()
{
	cout << x << "에서 " << y << "까지의 합 = " << sum << "입니다. " << endl;
}

void LoopAdder::run()
{
	read();
	sum = calculate();
	write();
}

class whileLoopAdder : public LoopAdder
{
protected:
	string name;
public:
	whileLoopAdder(string name) : LoopAdder(name) { this->name = name; }
	int calculate();
};

int whileLoopAdder::calculate()
{
	int x = getX();
	int y = getY();
	int sum{};

	while (1)
	{
		sum += x;
		x++;
		if (x == y + 1)
			break;
	}

	return sum;
}

class DoWhileLoopAdder : public LoopAdder
{
protected:
	string name;
public:
	DoWhileLoopAdder(string name) : LoopAdder(name) { this->name = name; }
	int calculate();
};

int DoWhileLoopAdder::calculate()
{
	int x = getX();
	int y = getY();
	int sum{};

	do {

		sum += x;
		x++;
		if (x == y + 1)
			break;

	} while (1);

	return sum;
}

int main()
{
	whileLoopAdder whileLoop("While Loop");
	DoWhileLoopAdder doWhileLoop("Do While Loop");

	whileLoop.run();
	doWhileLoop.run();
}
5. 디지털 회로에서 기본적인 게이트로 OR 게이트, AND 게이트, XOR 게이트 등이 있다. 이들은 각각 두 입력 신호ㅓ를 받아 OR 연산, AND 연산, XOR 연산을 수행한 결과를 출력한다. 이 게이트들을 각각 ORGate, XORGate, ANDGate 클래스로 작성하고자 한다. ORGate, XORGate, ANDGate 클래스가 AbstractGate를 상속받도록 작성하라.
[결과]

[소스 코드]
#include <iostream>
using namespace std;

class AbstractGate
{
protected:
	bool x, y;
public:
	void set(bool x, bool y) { this->x = x; this->y = y; }
	virtual bool operation() = 0;
};

class ANDGate : public AbstractGate
{
protected:
	bool x, y;
public:
	void set(bool x, bool y) { this->x = x; this->y = y; }
	bool operation()
	{
		if (x && y)
			return true;
		else
			return false;
	}
};

class ORGate : public AbstractGate
{
protected:
	bool x, y;
public:
	void set(bool x, bool y) { this->x = x; this->y = y; }
	bool operation()
	{
		if (x || y)
			return true;
		else
			return false;
	}
};

class XORGate : public AbstractGate
{
protected:
	bool x, y;
public:
	void set(bool x, bool y) { this->x = x; this->y = y; }
	bool operation()
	{
		if (x && y)
			return false;
		else if (!x && !y)
			return false;
		else if (x || y)
			return true;
		else
			return false;
	}
};

int main()
{
	ANDGate andGate;
	ORGate orGate;
	XORGate xorGate;

	andGate.set(true, false);
	orGate.set(true, false);
	xorGate.set(true, false);
	cout.setf(ios::boolalpha);
	cout << andGate.operation() << endl;
	cout << orGate.operation() << endl;
	cout << xorGate.operation() << endl;
}
6. 다음 AbstractStack은 정수 스택 클래스로서 추상 클래스이다. . . . 이를 상속받아 정수를 푸시, 팝하는 IntStack 클래스를 만들고 사용 사례를 보여라.
[결과]

[소스 코드]
#include <iostream>
using namespace std;

class AbstractStack {
public:
	virtual bool push(int n) = 0;
	virtual bool pop(int& n) = 0;

	virtual int size() = 0;
};

class IntStack : public AbstractStack {
	int stack[5] = { 0 };
	int top = -1;
public:
	bool push(int n) {
		if (size() + 1 >= 5) {
			cout << "스택이 다 찻습니다." << endl;
			return false;
		}
		stack[++top] = n;
		return true;
	}
	bool pop(int& n) {
		if (size() < 0) {
			cout << "스택이 비어있습니다." << endl;
			return false;
		}
		n = stack[top--];
		return true;
	}
	int size() {
		return top;
	}
	void show() {
		cout << "| ";
		for (int i = 0; i <= top; i++) {
			cout << stack[i] << ' ';
		}
		cout << "|" << endl;
	}
};

int main() {
	IntStack intStack;

	intStack.push(1);
	intStack.push(2);
	intStack.push(3);
	intStack.push(4);
	intStack.push(5);
	intStack.push(6);

	intStack.show();

	int n;
	intStack.pop(n);
	cout << n << " is popped" << endl;
	intStack.show();

	return 0;
}
[ 7 ~ 8 ] 사각형에 내접하는 도형을 표현하기 위한 Shape 클래스가 있다.
7. Shape 클래스를 상속받아 타원을 표현하는 Oval. 사각형을 표현하는 Rect, 삼각형을 표현하는 Triangular 클래스를 작성하라. main()을 작성하고 실행하면 다음과 같다.
[결과]

[소스 코드]
#include <iostream>
using namespace std;
#define PI 3.14;

class Shape
{
protected:
	string name;
	int width, height;
public:
	Shape(string n = " ", int w = 0, int h = 0) { name = n; width = w; height = h; }
	virtual double getArea() { return 0; }
	string getName() { return name; }
};

class Oval : public Shape
{
protected:
	string name;
	int width, height;
public:
	Oval(string n = " ", int w = 0, int h = 0) : Shape(n, w, h) { name = n; width = w; height = h; }
	double getArea() { return width * height * PI; }
	string getName() { return name; }
};

class Rect : public Shape
{
protected:
	string name;
	int width, height;
public:
	Rect(string n = " ", int w = 0, int h = 0) : Shape(n, w, h) { name = n; width = w; height = h; }
	double getArea() { return width * height; }
	string getName() { return name; }
};

class Triangular : public Shape
{
protected:
	string name;
	int width, height;
public:
	Triangular(string n = " ", int w = 0, int h = 0) : Shape(n, w, h) { name = n; width = w; height = h; }
	double getArea() { return width * height / 2; }
	string getName() { return name; }
};

int main()
{
	Shape* p[3];
	p[0] = new Oval("빈대떡", 10, 20);
	p[1] = new Rect("찰떡", 30, 40);
	p[2] = new Triangular("토스트", 30, 40);
	for (int i = 0; i < 3; i++)
		cout << p[i]->getName() << "넓이는 " << p[i]->getArea() << endl;
	for (int i = 0; i < 3; i++)
		delete p[i];
}
8. 문제 7에 주어진 Shape 클래스를 추상 클래스로 만들고 문제 7을 다시 작성하라.
[소스 코드]
#include <iostream>
using namespace std;
#define PI 3.14;

class Shape
{
protected:
	string name;
	int width, height;
public:
	Shape(string n = " ", int w = 0, int h = 0) { name = n; width = w; height = h; }
	virtual double getArea() = 0;
	string getName() { return name; }
};

//이하 같음
9. 다음 그림과 같은 상속 구조를 갖는 클래스를 설계한다. (그림 생략) 모든 프린터는 모델명(model), 제조사(manufacturer), 인쇄 매수(printedCount), 인쇄 종이 잔량(avaliableCount)을 나타내는 정보를 가진다. print(int pages)함수와 show() 함수는 가상 함수로 구현하라. print(int pages)는 pages 만큼 프린트하는 함수이고, show() 함수는 현재 프린트의 모델, 제조사, 인쇄 매수, 인쇄 종이 잔량 등을 출력하는 함수이다. 잉크젯 프린터는 잉크 잔량(avaliableInk) 정보를 추가적으로 가지며, 레이저 프린터는 토너 잔량(avaliableToner)정보를 추가적으로 가진다. 이들의 print(int pages) 멤버 함수는 프린터 타입에 맞게 구현하라. 각 클래스를 설계 구현하고 당름과 같이 실행되도록 전체 프로그램을 완성하라. InkJetPrinter 객체와 LaserPrinter 객체를 각각 하나만 동적으로 생성하여 시작한다.
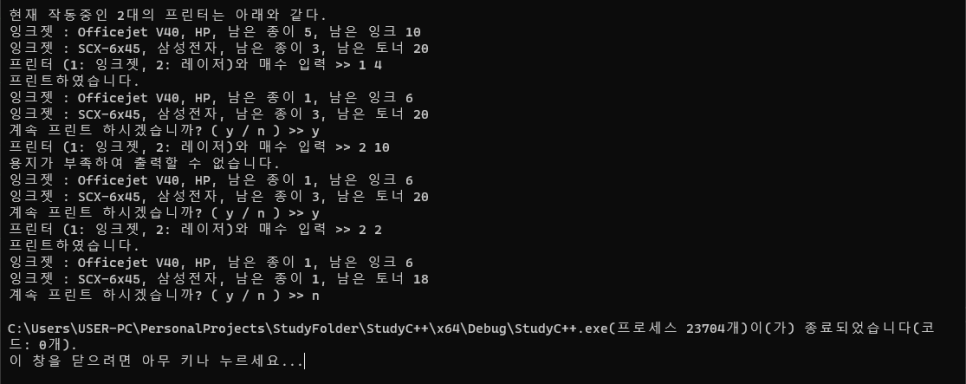
[결과]
[소스 코드]
#include <iostream>
using namespace std;

class Printer
{
protected:
	string model;
	string manufacturer;
	int printedCount;
	int avaliableCount;
public:
	virtual void print(int pages) = 0;
	virtual void show() = 0;
};

class InkjetPrinter : public Printer
{
protected:
	int ink{ 10 };
public:
	InkjetPrinter() {
		model = "Officejet V40";
		manufacturer = "HP";
		avaliableCount = 5;
		show();
	}
	int avaliableInk()
	{
		return ink;
	}
	void print(int pages)
	{
		if (avaliableCount < pages || ink < pages)
		{
			cout << "용지가 부족하여 출력할 수 없습니다." << endl;
		}
		else
		{
			avaliableCount -= pages;
			ink -= pages;
			cout << "프린트하였습니다." << endl;
		}
	}
	void show()
	{
		cout << "잉크젯 : " << model << ", " << manufacturer << ", 남은 종이 " << avaliableCount << ", 남은 잉크 " << avaliableInk() << endl;
	}
};

class LaserPrinter : public Printer
{
protected:
	int toner{ 20 };
public:
	LaserPrinter() {
		model = "SCX-6x45";
		manufacturer = "삼성전자";
		avaliableCount = 3;
		show();
	}
	int avaliableToner()
	{
		return toner;
	}
	void print(int pages)
	{
		if (avaliableCount < pages || toner < pages)
		{
			cout << "용지가 부족하여 출력할 수 없습니다." << endl;
		}
		else
		{
			avaliableCount -= pages;
			toner -= pages;
			cout << "프린트하였습니다." << endl;
		}
	}
	void show()
	{
		cout << "잉크젯 : " << model << ", " << manufacturer << ", 남은 종이 " << avaliableCount << ", 남은 토너 " << avaliableToner() << endl;
	}
};

int main()
{
	cout << "현재 작동중인 2대의 프린터는 아래와 같다." << endl;
	InkjetPrinter inkjet;
	LaserPrinter laser;
	int choice, count;
	char yORn;
	while (true)
	{
		reInput:
		cout << "프린터 (1: 잉크젯, 2: 레이저)와 매수 입력 >> ";
		cin >> choice >> count;
		if (choice == 1)
		{
			inkjet.print(count);
		}
		else if (choice == 2)
		{
			laser.print(count);
		}
		else
		{
			cout << "입력이 잘못되었습니다. 다시 입력해주세요. " << endl;
			goto reInput;
		}
		inkjet.show();
		laser.show();
		reyORn:
		cout << "계속 프린트 하시겠습니까? ( y / n ) >> ";
		cin >> yORn;
		if (yORn == 'y')
			continue;
		else if (yORn == 'n')
		{
			break;
		}
		else
		{
			cout << "입력이 잘못되었습니다. 다시 입력해주세요. " << endl;
			goto reyORn;
		}

	}
	return 0;
}
10. 간단한 그래픽 편집기를 콘솔 바탕으로 만들어보자. 그래픽 편집기의 기능은 "삽입", "삭제", "모두보기", "종료"의 4가지이고, 실행 과정은 다음과 같다. . . .
[결과]

[소스 코드]
#include <iostream>
using namespace std;

class Shape {
	Shape* next;
protected:
	virtual void draw() = 0;
public:
	Shape() { next = NULL; }
	virtual ~Shape() {}
	Shape* add(Shape* p) {
		this->next = p;
		return p;
	}
	void paint() {
		draw();
	}
	Shape* getNext() { return next; }
};

class Line : public Shape {
protected:
	virtual void draw() {
		cout << "Line" << endl;
	}
};

class Circle : public Shape {
protected:
	virtual void draw() {
		cout << "Circle" << endl;
	}
};

class Rectangle : public Shape {
protected:
	virtual void draw() {
		cout << "Rectangle" << endl;
	}
};

class UI {
public:
	static int getMenu() {
		int key;
		cout << "삽입:1, 삭제:2, 모두보기:3, 종료:4 >>";
		cin >> key;
		return key;
	}
	static int getShapeTypeToInsert() {
		int key;
		cout << "선:1, 원:2, 사각형:3 >>";
		cin >> key;
		return key;
	}
	static int getShapeIndexToDelete() {
		int key;
		cout << "삭제하고자 하는 도형의 인덱스 >>";
		cin >> key;
		return key;
	}
};

class GraphicEditor {
	Shape* pStart;
	Shape* pLast;
public:
	GraphicEditor() { pStart = pLast = NULL; }
	void insertItem(int type) {
		Shape* p = NULL;
		switch (type) {
		case 1:
			p = new Line();
			break;
		case 2:
			p = new Circle();
			break;
		case 3:
			p = new Rectangle();
			break;
		default:
			break;
		}
		if (pStart == NULL) {
			pStart = p;
			pLast = p;
			return;
		}
		pLast->add(p);
		pLast = pLast->getNext();
	}
	void deleteItem(int index) {
		Shape* pre = pStart;
		Shape* tmp = pStart;
		if (pStart == NULL) {
			cout << "도형이 없습니다!" << endl;
			return;
		}
		for (int i = 1; i < index; i++) {
			pre = tmp;
			tmp = tmp->getNext();
		}
		if (tmp == pStart) {
			pStart = tmp->getNext();
			delete tmp;
		}
		else {
			pre->add(tmp->getNext());
			delete tmp;
		}
	}
	void show() {
		Shape* tmp = pStart;
		int i = 1;
		while (tmp != NULL) {
			cout << i++ << ": ";
			tmp->paint();
			tmp = tmp->getNext();
		}
	}
	void run() {
		cout << "그래픽 에디터입니다." << endl;
		int menu, index, type;
		while (true) {
			menu = UI::getMenu();
			switch (menu) {
			case 1:
				type = UI::getShapeTypeToInsert();
				insertItem(type);
				break;
			case 2:
				index = UI::getShapeIndexToDelete();
				deleteItem(index);
				break;
			case 3:
				show();
				break;
			default:
				return;
			}
		}
	}
};

int main() {
	GraphicEditor graphicEditor;
	graphicEditor.run();

	return 0;
}
책에서 나오는 힌트나 조건들의 일부는 저작자 존중을 위해 일부러 작성하지 않았습니다.
개인 공부용으로 올리는 만큼 풀이에 대한 지적 감사하겠습니다.

'C-C++ > 명품 C++ Programming' 카테고리의 다른 글
| [(개정판) 명품 C++ programming] 11장 실습 문제 (0) | 2023.01.08 |
|---|---|
| [(개정판) 명품 C++ programming] 10장 실습 문제 (0) | 2023.01.07 |
| [(개정판) 명품 C++ programming] 8장 실습 문제 (2) | 2023.01.07 |
| [(개정판) 명품 C++ programming] 7장 실습 문제 (0) | 2023.01.06 |
| [(개정판) 명품 C++ programming] 6장 실습 문제 (0) | 2023.01.06 |